Figure 7-1
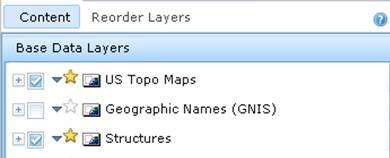
Example of Content Layer Checkbox
Example of Content Layer Checkbox
The Overlays tab pane is located on the left-hand side of the browser window and consists of two sub-tabs: Content and Reorder Layers. When the Overlays tab is expanded, the Content sub-tab is active by default. This is where you can choose which data layers you would like to visualize on your map in The National Map Viewer. The Content sub-tab contains panels that group data thematically. The Reorder Layers sub-tab allows you to change the order in which layers are drawn on the map display.
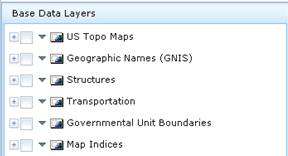
The Content sub-tab of the Overlays pane contains the layers that can be visualized on the map. Layers contain data that, when turned on, appear over the base map. They can also be manipulated and queried against for analytic purposes. If the layer is on, it will appear on the map, and if it is turned off, it will not be visible. The layers are grouped into themes, or panels, on the Content sub-tab. They can be thought of as a directory tree of data content that can be viewed on the map.
Layers in the Content pane can be turned on and off using the checkbox next to each layer. A check mark means the layer is active and can be viewed on the map if the data is visible at the current map extent. Active layers can be identified. An empty checkbox means that the layer is not active on the map display.
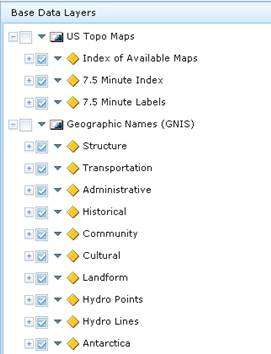
Layers in the Content sub-tab can be expanded so that you can view sub-layers. This is helpful because you can turn on a subset of feature layers from the parent layer. The fewer features that need to be brought into the map when you turn on a layer, the faster it will load.
 button next to the desired layer (Figure 7-2).
  button.
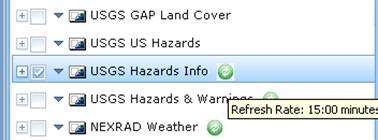
Some data layers in The National Map Viewer, such as in the Other Featured Data panel, contain dynamic content that is refreshed periodically. These layers have a Refresh icon that is located to the right of the layer name in the Content pane under Overlays. Holding the cursor on the Refresh icon causes a small ToolTip to appear that displays the refresh rate for the layer.
Below is a step-by-step example of how to use the Refresh icon.
 located to the right of the
layer name.
located to the right of the
layer name.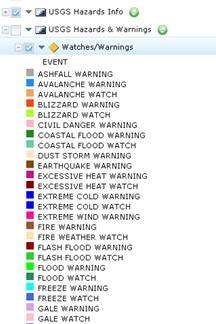
Symbology is a set of conventions, rules, or encoding systems that define how geographic features are represented with symbols on a map, such as a legend. In the Overlays pane, you can navigate to a layer and view the symbology that is used on the map display for that particular layer. This enables you to have a clear understanding of how features on that layer are represented on the map display.

The Content sub-tab in the Overlays pane has a panel named User Added Content (Figure 7-5). This panel is important because it contains the content that you have added to The National Map Viewer. You can add data to the map display using the Add Data tool on the toolbox (see Section 5.0 The Toolbox). You can add annotations to the map using the tools on the Annotation tab of the toolbox. Therefore, the User Added Content panel contains annotation layers as well as layers added using the Add Data tool.
Layers contained in the User Added Content panel can be interacted with just like any other content layer. You can turn the layers on and off so that the data will appear or disappear on the map display. You can also expand a layer to see any sub-layers associated with it. See Section 7.1 The Content Sub-Tab to learn more. Use the Delete option on the shortcut menu to delete data you've added to The National Map Viewer. Click on the down arrow symbol next to the layer name and choose the Delete option on the shortcut menu. See Section 7.4 Shortcut Menu to learn more.
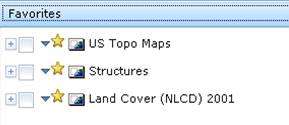
The Favorites panel is contained within the Content sub-tab in the Overlays pane (Figure 7-6). Layers that are starred are added to the Favorites group so they can be accessed more easily. To add a layer to the Favorites group, highlight the star next to the desired layer. The item in the Favorites group will mimic the original layer, meaning that any changes to the state of the layer will be the same in both the original layer and in the Favorites layer. Therefore checking or unchecking the layer checkbox or sub-layers checkboxes in the Favorites group layer will apply to the original layer and vice versa. If no star appears next to a layer, then it cannot be added to the Favorites group. For example, annotation layers cannot be favorites, so no star will be found next to annotation layers. To remove a layer from the Favorites group, click the highlighted star to clear it, so that it is no longer highlighted.
To add a layer to the Favorites group, highlight the star next to the desired layer. If no star appears next to a layer, then it cannot be added to the Favorites group.
To remove a layer from the Favorites group, clear the star next to either the original layer or the layer in Favorites so that it is no longer highlighted.
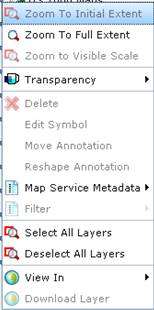
The shortcut menu contains additional functionality for a particular layer. Tools within the shortcut menu include: Zoom To Initial Extent, Zoom To Full Extent, Zoom to Visible Scale, Transparency, Delete, Edit Symbol, Move Annotation, Reshape Annotation, Map Service Metadata, Filter, Select All Layers, Deselect All Layers, and View In. Each tool is described below in more detail. To access the shortcut menu, click the down arrow next to the desired layer name. To access certain options on the shortcut menu, the layer will need to be activated by either expanding it or turning it on. Options that are not available for the layer will appear dimmed or grayed out as hidden.
Note: This tool will be available in the future.
The shortcut menu on the Content sub-tab contains a Zoom To Initial Extent option. This tool zooms to the initial extent of the specified layer. The initial extent of the layer is defined by the map document that was used to create the layer or service. To use this tool, you first need to activate the layer by turning it on or expanding it. If the specified layer has not been activated, the Zoom To Initial Extent option will appear dimmed. Once the layer has been activated, the Zoom To Initial Extent option becomes available on the shortcut menu.
Note: This tool currently works only if layers are in the Web Mercator spatial reference system instead of WGS 84. Full functionality may become available in the future.
The shortcut menu on the Content sub-tab contains a Zoom To Full Extent option. This tool zooms to the full extent of all features contained within the specified layer. The full extent of the layer is defined by the map document that was used to create the layer or service. To use this tool, you first need to activate the layer by turning it on or expanding it. If the specified layer has not been activated, the Zoom To Full Extent option will appear dimmed. Once the layer has been activated, the Zoom To Full Extent option becomes available on the shortcut menu.
Note: This tool will be available in the future.
The shortcut menu on the Content sub-tab contains the Zoom to Visible Scale option. This tool zooms to the farthest out scale at which a layer is visible. Not all layers have minimum or maximum scale dependencies associated with them. When this tool is accessed for these layers, a pop-up warning message informs the user that "No scale has been defined for this layer." The Zoom to Visible Scale option is only available for layers within a map service and is not available for the map service itself. To use this tool, you first need to activate the layer by turning it on or expanding it. If the specified layer has not been activated, the Zoom to Visible Scale option will appear dimmed. Once the layer has been activated, the Zoom to Visible Scale option becomes available on the shortcut menu.
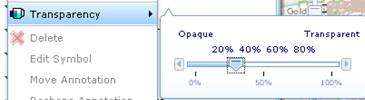
The shortcut menu on the Content sub-tab contains a Transparency option. This tool allows you to alter a layer's transparency. To use this tool, you first need to activate the layer by turning it on or expanding it. If the specified layer has not been activated, the Transparency option will appear dimmed. Once the layer has been activated, the Transparency option becomes available on the shortcut menu.
The shortcut menu on the Content sub-tab contains a Delete option. This tool allows you to delete a layer you have added to the map display. You can also delete individual features using the Delete menu option. Only annotation layers and layers added using the Add Data tool (see Section 5.17 Add Data) and in the User Added Content panel (see Section 7.2 User Added Content Panel) will have this option available. Any other The National Map Viewer layers will have the Delete option dimmed on the shortcut menu.
Note: You will need to add in the layer or service you just deleted (using the Add Data tool on the toolbox) if you want to visualize or use it again on the map display.
The shortcut menu on the Content sub-tab contains an Edit Symbol option. This tool allows you to edit the symbol of an individual feature. Only annotation layers will have this option available. Any other National Map Viewer layers will have the Edit Symbol option dimmed on the shortcut menu.
The shortcut menu on the Content sub-tab contains a Move Annotation option. This tool allows you to move an individual annotation on the map. Only annotation layer features will have this option available. Any other data layers will have the Move Annotation option dimmed on the shortcut menu.
The shortcut menu on the Content sub-tab contains a Reshape Annotation option. This tool allows you to reshape an individual annotation on the map. Only annotation layer features will have this option available. Any other data layers will have the Reshape Annotation option dimmed on the shortcut menu.
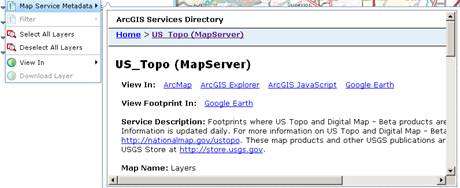
Metadata is often described as data about data. It may contain information about who created the data, when it was created, how it was collected and assembled, or how reliable it is (just to name a few). Metadata is usually created by the data author but can be added at many stages of the data creation process. Not all data in The National Map Viewer has metadata associated with it. This is because there are many metadata standards but no single, unified standard. When metadata does exist, there is no standard for what it contains and how it is presented. Therefore, the Map Service Metadata option on the shortcut menu will only be available for data layers that have metadata defined for them. If there is no metadata for the specified layer, the Map Service Metadata option will be unavailable.
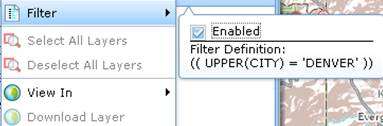
The shortcut menu on the Content sub-tab contains a Filter option. This option can be used to turn filters on and off for a specified layer. A filter only displays the features that match the criteria in the map display for a specified layer. For example, if you only want to see hospitals located in the State of Maryland when you turn on the hospitals layer, you can create a filter. If you want to see all hospitals, you can disable the filter. Filters can be created using the Query Builder tool (see Section 5.19 Query Builder) and are managed using the Filter Manager tool (see Section 5.20 Filter Manager). If there are no filters defined for the specified layer in the current session of The National Map Viewer, the Filter option will be dimmed and unavailable. If a filter is defined for the specified layer, the Filter option provides a mechanism for enabling and disabling the filter. If the filter is enabled, only those features that meet its criteria are displayed on the map. If the filter is disabled, all features on the layer are displayed on the map.

The Select All Layers option in the shortcut menu allows you to select all sub-layers of a layer.
The Deselect All Layers option in the shortcut menu allows you to deselect all sub-layers of a layer.

Note: The View In: ArcMap option does not work but may become available in the future.
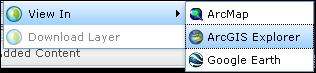
The shortcut menu on the Content tab contains a View In option. This option allows you to display the specified layer in ArcMap, ArcGIS Explorer, or Google Earth. Selecting any of these options will display a pop-up dialog box that allows you to save a file that can be viewed in the selected viewer. If you want to view a layer in ArcMap, the Save pop-up lets you save a layer file with a .lyr extension. If you want to view a layer in ArcGIS Explorer, the Save pop-up lets you save the layer as an ArcGIS Explorer map file with an .nmf extension. If you want to view a layer in Google Earth, the Save pop-up lets you save the layer as a compressed KML file with a .kmz extension. Once you save the layer in the appropriate file format, you can view the layer in the desired viewer.
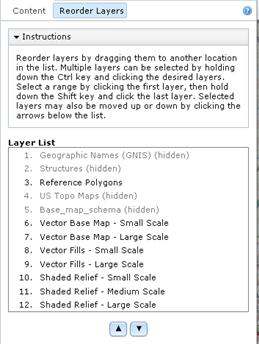
The Reorder Layers sub-tab allows you to change the order in which layers are displayed in The National Map Viewer. You can move layers up and down within the reorder list. This upward and downward movement changes the visibility of layers on the map display. The layers are put on top of or below other layers. A layer higher in the list will draw on top of lower layers.
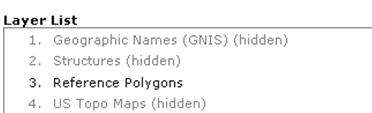
All layers that are loaded during the current viewer session are added to the Layer List. If the layer has been loaded but is not currently visible, it is grayed out and marked as hidden in the Layer List.
 or down
  arrow to move the layer name
within the layer list to the desired draw order.
arrow to move the layer name
within the layer list to the desired draw order.